
SaltStack简单介绍和安装
浏览量:1122
一、入门指南
1.1 SALTSTACK是什么?
The backbone of Salt is the remote execution engine, which creates a high-speed, secure and bi-directional communication net for groups of systems. On top of this communication system, Salt provides an extremely fast, flexible, and easy-to-use configuration management system called Salt States.
Salt是一种和以往不同的基础设施管理方法,它是建立在大规模系统高速通讯能力可以大幅提升的想法上。这种方法使得Salt成为一个强大的能够解决基础设施中许多特定问题的多任务系统。远程执行引擎是Salt的核心,它能够为多组系统创建高速、安全的双向通讯网络。基于这个通许系统,Salt提供了一个非常快速、灵活并且容易使用的配置管理系统,称之为“Salt States”。
1.2 SALTSTACK有什么特性?
(1)、部署简单,方便
(2)、支持大部分UNIX/Linux及Windows环境;
(3)、主从集中化管理;
(4)、配置简单、功能强大、扩展性强;
(5)、主控端(master)和被控端(minion)基于证书认证,安全可靠;
(6)、支持API及自定义模块,可通过Python轻松扩展。
1.3 Master与Minion认证
(1)、minion在第一次启动时,会在/etc/salt/pki/minion/(该路径在/etc/salt/minion里面设置)下自动生成minion.pem(private key)和 minion.pub(public key),然后将 minion.pub发送给master。
1.4 Master与Minion连接
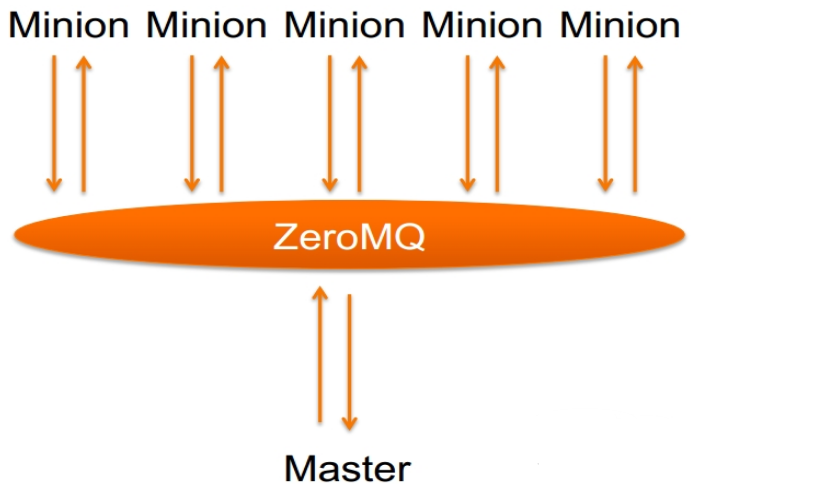
(1)、SaltStack master启动后默认监听4505和4506两个端口。4505(publish_port)为saltstack的消息发布系统,4506(ret_port)为saltstack客户端与服务端通信的端口。如果使用lsof 查看4505端口,会发现所有的minion在4505端口持续保持在ESTABLISHED状态。
(2)、minion与master之间的通信模式如下:
1.5 安装salt介绍
SaltStack has been made to be very easy to install and get started. The installation documents contain instructions for all supported platforms.
This section contains instructions to install Salt. If you are setting up your environment for the first time, you should install a Salt master on a dedicated management server or VM, and then install a Salt minion on each system that you want to manage using Salt. For now you don't need to worry about your architecture, you can easily add components and modify your configuration later without needing to reinstall anything.
The general installation process is as follows:
Install a Salt master using the instructions for your platform or by running the Salt bootstrap script. If you use the bootstrap script, be sure to include the
-Moption to install the Salt master.Make sure that your Salt minions can find the Salt master.
Install the Salt minion on each system that you want to manage.
Accept the Salt minion keys after the Salt minion connects.
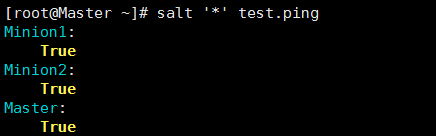
After this, you should be able to run a simple command and receive returns from all connected Salt minions.
salt '*' test.ping
1.6 对应安装平台
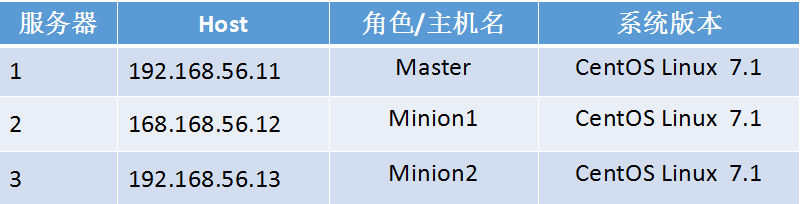
1.6 本次安装SALTSTACK环境介绍
二、SALTSTACK 安装
2.1 DEPENDENCIES依赖说明
Salt should run on any Unix-like platform so long as the dependencies are met.
Python 2.6 >= 2.6 <3.0
msgpack-python - High-performance message interchange format
YAML - Python YAML bindings
Jinja2 - parsing Salt States (configurable in the master settings)
MarkupSafe - Implements a XML/HTML/XHTML Markup safe string for Python
apache-libcloud - Python lib for interacting with many of the popular cloud service providers using a unified API
Requests - HTTP library
Tornado - Web framework and asynchronous networking library
futures - Backport of the concurrent.futures package from Python 3.2
Depending on the chosen Salt transport, ZeroMQ or RAET, dependencies vary:
ZeroMQ:
RAET:
Salt defaults to the ZeroMQ transport, and the choice can be made at install time, for example:
python setup.py --salt-transport=raet install
This way, only the required dependencies are pulled by the setup script if need be.
If installing using pip, the --salt-transport install option can be provided like:
pip install --install-option="--salt-transport=raet" salt
注意:
Salt does not bundle dependencies that are typically distributed as part of the base OS. If you have unmet dependencies and are using a custom or minimal installation, you might need to install some additional packages from your OS vendor.
Salt不捆绑通常作为基本操作系统的一部分分发的依赖关系。如果您有未满足的依赖项并且使用自定义或最小安装,则可能需要从操作系统供应商安装一些其他软件包。
2.2 SALTSTACK (yum)安装
指定官方yum源:
rpm -ivh https://repo.saltstack.com/yum/redhat/salt-repo-latest-1.el7.noarch.rpm
Salt Master:
yum -y install salt-master salt-minion
Salt Minion:
yum -y install salt-minion
修改Minion配置文件
#  vim /etc/salt/minion
master: 192.168.56.10   可以是主机名需要解析(指定服务端的IP地址)
id:   唯一标识符,可以不配,不配默认就是主机名
启动服务:
Master:
        systemctl start salt-minion
        systemctl start salt-master
Minoin:
        systemctl start salt-minion
查看master端口状态:

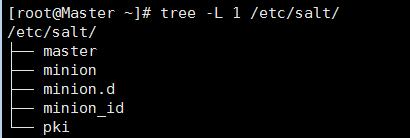
启动服务之后会在/etc/salt下面产生一个minion_id的配置文件(里面就是我们配置文件中指定的ID,可以不修改。不修改默认就是主机名)同时还会产生一个pki的文件,里面存放minion的公钥和私钥
配置说明:
salt启动之后会先读取minion_id里面的配置
[root@Minion1 ~]# cat /etc/salt/minion_id
Master
[root@Minion1 ~]# cat /etc/salt/minion_id
Minion1
[root@Minion2 ~]# cat /etc/salt/minion_id
Minion2
minion在启动的时候建立的
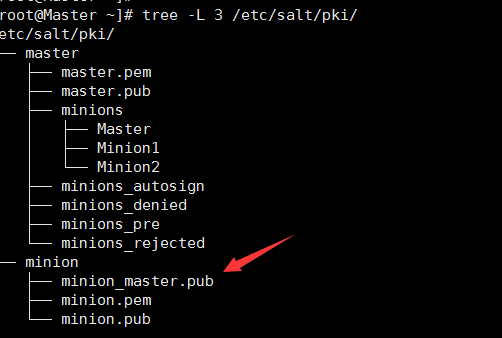
[root@Master salt]# tree -L 2 /etc/salt/pki/
/etc/salt/pki/
├── master
│   ├── master.pem
│   ├── master.pub
│   ├── minions
│   ├── minions_autosign
│   ├── minions_denied
│   ├── minions_pre
│   └── minions_rejected
└── minion
    ├── minion.pem   #私钥
    └── minion.pub   #公钥
配置完master启动minion的时候就会将公钥发送过去
Master详解:
[root@Master salt]# tree -L 3 /etc/salt/pki/
/etc/salt/pki/
├── master
│   ├── master.pem      #私钥
│   ├── master.pub      #公钥
│   ├── minions
│   ├── minions_autosign
│   ├── minions_denied
│   ├── minions_pre     #收到minion的公钥,等待master同意
│   │   ├── Master     #使用id作为公钥名称
│   │   ├── Minion1
│   │   └── Minion2
│   └── minions_rejected
└── minion
    ├── minion.pem      #私钥
    └── minion.pub      #公钥
认证:
帮助:
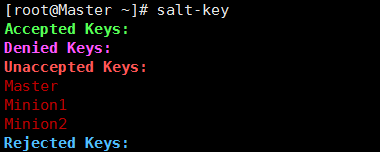
[root@Master ~]# salt-key --help
同意的三种方法:
[root@Master salt] salt-key -A
[root@Master salt] salt-key -a 指定id
[root@Master salt] salt-key -a 支持通配符
我们选择第一种演示
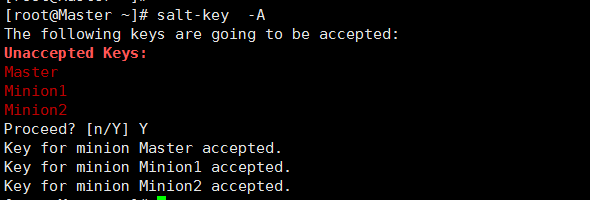
salt-key命令介绍:
-L  列出所有
-d 删除指定的支持通配符
-D 删除所有
-A 添加所有
-a 指定添加
同意之后master发送公钥
命令测试:
命令解析:
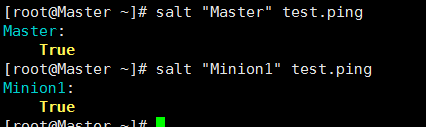
* 代表所有
‘ ’ 引号,防止扩展
test.ping 模块的方法
* 可以写Master或者Minion 也支持正则
三、命令测试:
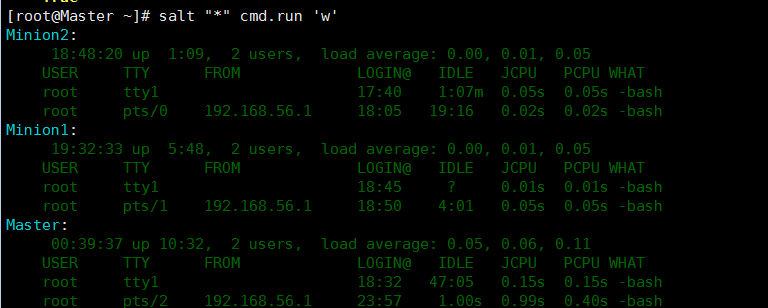
1.查看登录状态
salt "*" cmd.run 'w'
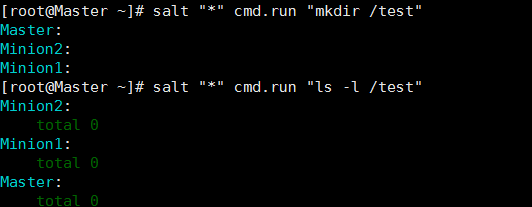
2.创建目录及查看创建:
salt "*" cmd.run "mkdir /test"
salt "*" cmd.run "ls -l /test"
典型案例:
² 远程执行salt ‘*’ cmd.run ‘uptime’
² State 你要写一个文件。格式:YAML 后缀.sls
state代表状态模块
YAML:三板斧
1、 缩进 (2个空格,不能使用Tab)
2、 冒号 key: value (注意key后面需要有空格)
3、 短横线 – list1 - list2 可以写多个
缩进和冒号表示层级关系:
冒号表示key: value   表示层级关系
短横线 – list      列表,后面都有空格
/etc/salt/master配置文件也是YAML语法
表示协议的肯定没有空格
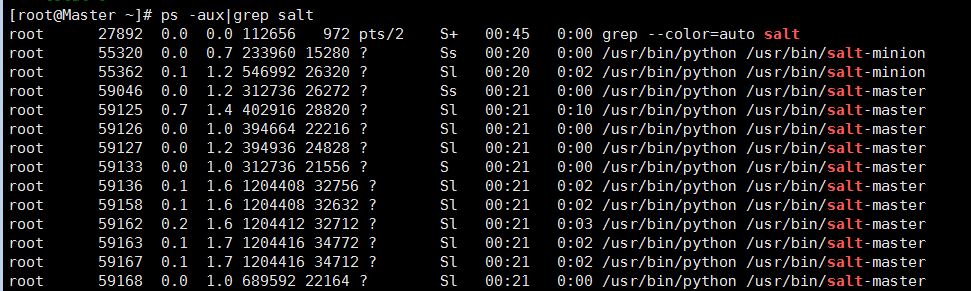
查看命令是否运行:
ps -aux|grep salt
Master配置 测试安装
案例一、
# vim /etc/salt/master
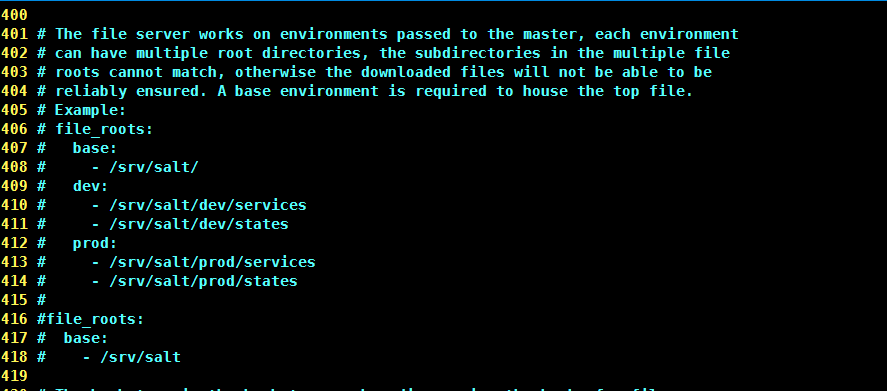
base 基础环境必须有
file_roots 配置项
- /srv/salt/ 列表,可以写多个路径

修改完配置文件需要重启
systemctl restart salt-master
因为里面定义了.sls存放的路径,需要我们创建
[root@Master ~]# mkdir /srv/salt -p #创建目录,用于存放sls
因为创建了/srv/salt 相当于创建了/ 比较乱,所以我们为了整洁创建一个web的文件夹
mkdir /srv/salt/web -p
切换到sls目录
cd /srv/salt/web/
我们安装一个apache服务,所以我们这里定义一个apache.sls
[root@Master web]# cat apache.sls
apache-install:
  pkg.installed:
    - names:
      - httpd
      - httpd-devel
apache-servic:
  service.running:
    - name: httpd
    - enable: True
参数介绍:
apache-install:  定义的ID
  pkg.installed:  pkg是一个模块是一个状态后面是模块的方法
    - names:  方法的一个参数
      - httpd
      - httpd-devel安装包名称
apache-servic:
  service.running:   模块  方法 running运行
    - name: httpd   运行服务的名称
- enable: True   开机自动启动
执行命令:
[root@Master web]# salt '*' state.sls web.apache
执行模块也可以是状态模块,web结果apache文件
运行地点:
cat /var/cache/salt/minion/files/base/web/apache.sls
执行结果如下
[root@Master web]# salt '*' state.sls   web.apache
Master:
----------
          ID: apache-install
    Function: pkg.installed
        Name: httpd
      Result: True
     Comment: The following packages were installed/updated: httpd
     Started: 00:55:59.517437
    Duration: 32821.597 ms
     Changes:
              ----------
              httpd:
                  ----------
                  new:
                      2.4.6-45.el7.centos
                  old:
              httpd-tools:
                  ----------
                  new:
                      2.4.6-45.el7.centos
                  old:
----------
          ID: apache-install
    Function: pkg.installed
        Name: httpd-devel
      Result: True
     Comment: The following packages were installed/updated: httpd-devel
     Started: 00:56:32.347203
    Duration: 35405.626 ms
     Changes:
              ----------
              apr-devel:
                  ----------
                  new:
                      1.4.8-3.el7
                  old:
              apr-util-devel:
                  ----------
                  new:
                      1.5.2-6.el7
                  old:
              cyrus-sasl:
                  ----------
                  new:
                      2.1.26-20.el7_2
                  old:
              cyrus-sasl-devel:
                  ----------
                  new:
                      2.1.26-20.el7_2
                  old:
              cyrus-sasl-lib:
                  ----------
                  new:
                      2.1.26-20.el7_2
                  old:
                      2.1.26-17.el7
              expat:
                  ----------
                  new:
                      2.1.0-10.el7_3
                  old:
                      2.1.0-8.el7
              expat-devel:
                  ----------
                  new:
                      2.1.0-10.el7_3
                  old:
              httpd-devel:
                  ----------
                  new:
                      2.4.6-45.el7.centos
                  old:
              libdb:
                  ----------
                  new:
                      5.3.21-19.el7
                  old:
                      5.3.21-17.el7_0.1
              libdb-devel:
                  ----------
                  new:
                      5.3.21-19.el7
                  old:
              libdb-utils:
                  ----------
                  new:
                      5.3.21-19.el7
                  old:
                      5.3.21-17.el7_0.1
              openldap:
                  ----------
                  new:
                      2.4.40-13.el7
                  old:
                      2.4.39-6.el7
              openldap-devel:
                  ----------
                  new:
                      2.4.40-13.el7
                  old:
----------
          ID: apache-servic
    Function: service.running
        Name: httpd
      Result: True
     Comment: Service httpd has been enabled, and is running
     Started: 00:57:07.787998
    Duration: 2090.702 ms
     Changes:
              ----------
              httpd:
                  True

Summary
------------
Succeeded: 3 (changed=3)
Failed:    0
------------
Total states run:     3
案例2 :高级配置top调用apache.sls
vim /etc/salt/master

[root@Master web]# cat  /srv/salt/top.sls
base:
  'Minion1':
    - web.apache
  'Minion2':
    - web.apache
执行命令:
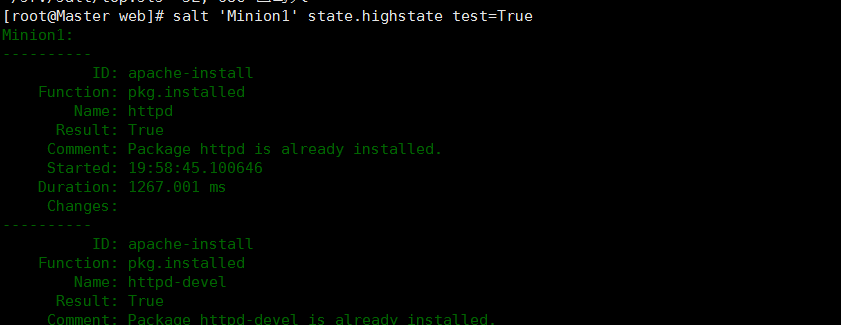
salt '*' state.highstate
salt 'linux*' state.highstate test=True 先测试 列出来不改变
注意:不要使用*
神回复
发表评论:
◎欢迎参与讨论,请在这里发表您的看法、交流您的观点。