
防火墙软件之Iptables
浏览量:1171
一、 What is iptables
Since Network Address Translation is also configured from the packet filter ruleset, iptables is used for this, too.
iptables is the userspace command line program used to configure the Linux 2.4.x and later packet filtering ruleset. It is targeted towards system administrators.
The iptables package also includes ip6tables. ip6tables is used for configuring the IPv6 packet filter.
百度百科:
防火墙(Firewall)是指在本地网络与外界网络之间的一道防御系统,是这一类防范措施总称。防火墙是在两个网络通信时执行的一种访问控制尺度,它能允许“被同意”的人和数据进入你的网络,同时将“不被同意”的人和数据拒之门外,最大限度地阻止网络中的黑客来访问你的网络。互联网上的防火墙是一种非常有效的网络安全模型,通过它可以使企业内部局域网与Internet之间或者与其他外部网络互相隔离、限制网络互访,从而达到保护内部网络目的。
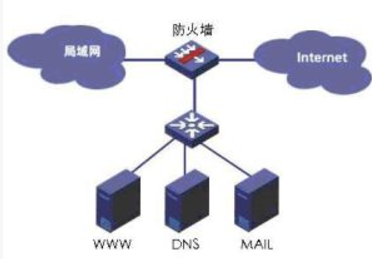
二、防火墙工作流程
iptables是采用数据包过滤机制工作的,所以他会对请求的数据包的包头数据进行分析,并根据我们预定规则进行匹配来决定是否可以进入主机。
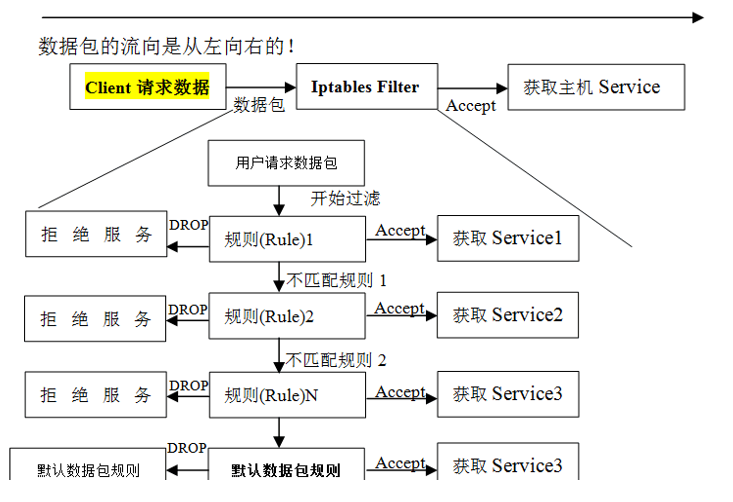
1.防火墙是一层层过滤的。实际是按照配置规则的顺序从上到下,从前到后进行过滤的。
2.如果匹配上规则,即明确表是阻止还是通过,此时数据包就不在向下匹配新规则了。
3.如果所有规则中没有明确是阻止还是通过这个数据包,也就是么有匹配上新规则,向下进行匹配,直到匹配默认规则得到明确的组织还是通过
4.防火墙的默认规则是对应链的所有规则执行完才会执行的。
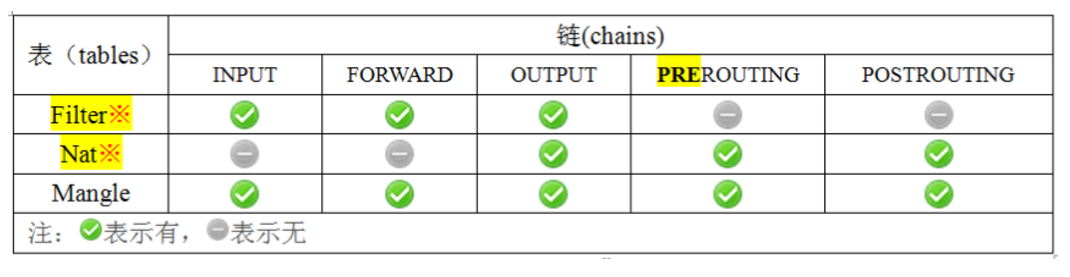
三、iptables表和链
iptables常用的表有四个,分别为 filter表 nat表 mangle表,RAW表 和五个链 INPUT链 OUTPUT链 FORWARE链 POSTROUTING链 PREROUTING链,下面来介绍下它们的各个功能:
3.1 iptable中的表
filter表——过滤数据包
Nat表——用于网络地址转换(IP、端口)
Mangle表——修改数据包的服务类型、TTL、并且可以配置路由实现QOS
Raw表——决定数据包是否被状态跟踪机制处理
注意:使用iptables -t 指定使用哪个表,不指定,默认使用filter表
3.2 iptables中的链
PREROUTING链——对数据包作路由选择前应用此链中的规则(所有的数据包进来的时侯都先由这个链处理)
INPUT链——进来的数据包应用此规则链中的策略
FORWARD链——转发数据包时应用此规则链中的策略
OUTPUT链——外出的数据包应用此规则链中的策略
POSTROUTING链——对数据包作路由选择后应用此链中的规则(所有的数据包出来的时侯都先由这个链处理)
3.3 iptables表和链的关系
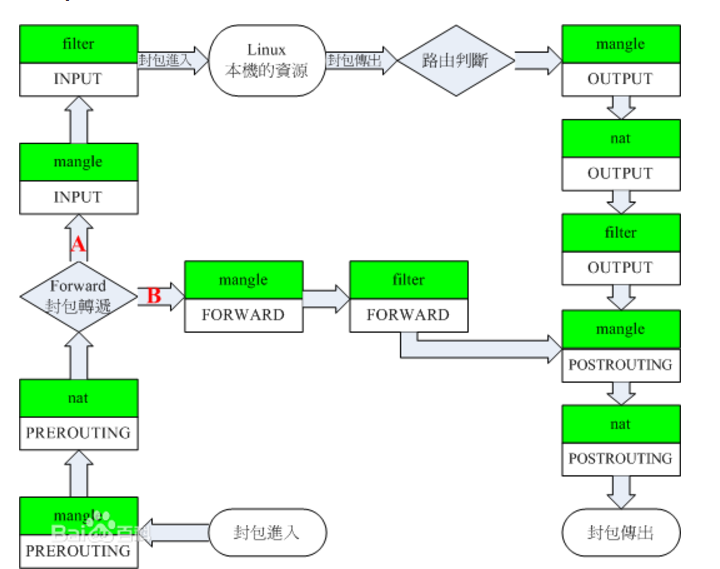
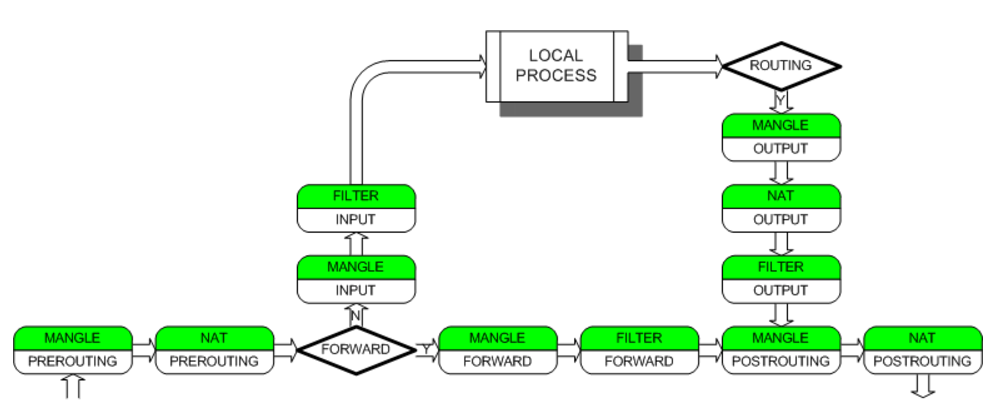
3.4 iptables 表和链的工作流程
四、配置iptables
4.1 检查是否安装iptables
[root@linux-node1 ~]# iptables -V
iptables v1.4.7
[root@linux-node1 ~]# rpm -qa iptables
iptables-1.4.7-16.el6.x86_64
4.2 检查iptables当前规则
[root@linux-node1 ~]# iptables -nL
Chain INPUT (policy ACCEPT)
默认规则如下:
target     prot opt source               destination
ACCEPT     all  --  0.0.0.0/0            0.0.0.0/0           state RELATED,ESTABLISHED
ACCEPT     icmp --  0.0.0.0/0            0.0.0.0/0
ACCEPT     all  --  0.0.0.0/0            0.0.0.0/0
ACCEPT     tcp  --  0.0.0.0/0            0.0.0.0/0           state NEW tcp dpt:22
REJECT     all  --  0.0.0.0/0            0.0.0.0/0           reject-with icmp-host-prohibited

Chain FORWARD (policy ACCEPT)
target     prot opt source               destination
REJECT     all  --  0.0.0.0/0            0.0.0.0/0           reject-with icmp-host-prohibited

Chain OUTPUT (policy ACCEPT)
target     prot opt source               destination
4.3 增加模块到Linux内核
modprobe ip_tables
modprobe iptable_filter
modprobe iptable_nat
modprobe ip_conntrack
modprobe ip_conntrack_ftp
modprobe ip_nat_ftp
modprobe ipt_state
[root@linux-node1 ~]# lsmod |egrep "nat|filter|ipt"
nf_nat_ftp              3443  0
nf_conntrack_ftp       12049  1 nf_nat_ftp
iptable_nat             5923  0
nf_nat                 22676  2 nf_nat_ftp,iptable_nat
ipt_REJECT              2351  2
nf_conntrack_ipv4       9186  5 iptable_nat,nf_nat
iptable_filter          2793  1
ip_tables              17831  2 iptable_nat,iptable_filter
nf_conntrack           79537  7 nf_nat_ftp,nf_conntrack_ftp,iptable_nat,nf_nat,nf_conntrack_ipv4,nf_conntrack_ipv6,xt_state
ip6table_filter         2889  1
ip6_tables             18732  1 ip6table_filter
4.4 iptables相关操作帮助
iptables  -A     #增加链规则,追加,默认在最下面
iptables  -C     #修改链规则
iptables  -D     #删除链规则, -D 后面加一数字表示删除哪行
iptables  -I     #插入一条新规则 -I 后面加一数字表示插入到哪行,默认在最上面
iptables  -R     #替换一条新规则 -R 后面加一数字表示替换哪行
iptables  -L     #查看规则 –L 还有几个子选项如下
                    iptables -L -n 以数字的方式显示
                    iptables -L -v 显示详细信息
                    iptables -L -x 显示精确信息
                    iptables -L --line-numbers 显示行号
iptables  -F     #清空链中的所有规则
iptables  -X     #删除一个自定义链,删除之前要保证次链是空的,而且没有被引用
iptables  -Z     #链的计数器清零
iptables  -N     #新建一个链
iptables  -P     #设置默认规
iptables  -E     #重命名链
示例:
# 在INPUT链添加一条规则
iptables -A INPUT -s 127.0.0.1 -d 127.0.0.1 -j ACCEPT
# 在OUTPUT链添加一条规则
iptables -A OUTPUT -s 127.0.0.1 -d 127.0.0.1 -j ACCEPT
# 将INPUT链上的第二条规则替换
iptables -R INPUT 2 -s 172.16.0.0/16 -d 172.16.100.1 -p tcp --dport 22 -m state --state NEW,ESTABLISHED -j ACCEPT
# 将OUTPUT链第一条规则替换
iptables -R OUTPUT 1 -m state --state ESTABLISHED -j ACCEPT
注意:--deport 指定端口 可以指定目标端口范围,如 --dport 20:80
#设置默认规则:
iptables -P INPUT DROP
iptables -P OUTPUT ACCEPT
iptables -P FORWARD DROP
4.5 条件匹配
4.5.1 基本匹配
-s    #源地址
-d    #目标地址
-p    #协议{tcp|udp|icmp}
-i    #从哪个网络接口进入,比如 -i eth0
-o    #从哪个网络接口出去,比如 -o eth0
4.5.2 扩展匹配
-p {tcp|udp} --sport   指定源端口
-p {tcp|udp} --dport 指定目标端口-m state --state #匹配状态的 -m mutiport --source-port #端口匹配 ,指定一组端口 -m limit --limit 3/minute #每三分种一次 -m limit --limit-burst 5 #只匹配5个数据包 -m string --string --algo bm|kmp --string "xxxx" #匹配字符串 -m time --timestart 8:00 --timestop 12:00 #表示从哪个时间到哪个时间段 -m time --days #表示那天 -m mac --mac-source xx:xx:xx:xx:xx:xx #匹配源MAC地址 -m layer7 --l7proto qq #表示匹配腾讯qq的 当然也支持很多协议,这个默认是没有的,需要我们给内核打补
-j ACCEPT    #允许
-j REJECT    #拒绝
-j DROP      #拒绝并提示信息
-j SNAT      #源地址转换
-j DNAT      #目标地址转换
-j REDIRECT  #重定向
-j MASQUERAED  #地址伪装
-j LOG --log-prefix "说明信息,自己随便定义"   #记录日志
4.7 iptables几个状态
NEW:新发出请求;连接追踪模板中不存在此连接的相关信息条目,因此,将其识别为第一次发出的请求;
ESTABLISHED:NEW状态之后,连接追踪模板中为其建立的条目失效之前期间内所进行的通信状态;
RELATED:相关联的连接;如ftp协议中的数据连接与命令连接之间的关系;
INVALID:无效的连接;
UNTRACKED:未进行追踪的连接;
iptables -A INPUT  -m state --state ESTABLISHED,RELATED -j ACCEPT
iptables -A OUTPUT -m state --state ESTABLISHED,RELATED -j ACCEPT
限定指定时间包的允许通过数量及并发数:
iptables -A OUTPUT -m limit --limit n/{second/minute/hour}--limit-burst [n]
iptables -I INPUT -s 10.0.1.0/24 -p icmp --icmp-type 8 -m limit --limit 5/min --limit-burst 2 -j ACCEPT
/etc/init.d/iptables save 保存到/etc/sysconfig/iptables
iptables-save >/etc/sysconfig/iptables
iptables -A INPUT -s 10.0.0.0/24 DROP
iptables -A INPUT ! -s 10.0.0.0/24 DROP
iptables -A INPUT -p tcp --dport 22 -i eth0 ! -s 10.0.0.0/24 DROP
iptables -A INPUT -p tcp --dport 3306 -j DROP
iptables -A INPUT -p tcp
iptables -A INPUT -p udp
iptables -A INPUT ! -p tcp
iptables -A INPUT -p icmp --icmp-type 8
iptables -A INPUT -p icmp --icmp-type 8 -j DROP
iptables -A INPUT -p icmp -m icmp --icmp-type any -j ACCEPT
iptables -A INPUT -p tcp --sport 22   #源端口
iptables -A INPUT -p tcp --dport 22   #目的端口
iptables -A INPUT -p tcp --sport 22:80
iptables -A INPUT -p tcp --dport 21,22,23 -j DROP---->错误语法
iptables -I INPUT -p tcp -m multiport --dport 22,23,24,25 -j DROP
iptables -I INPUT -p tcp -m multiport ! --dport 22,23,24,25 -j DROP
iptables -I INPUT -p tcp --dport 3306:8809 -j ACCEPT
iptables -I INPUT -p tcp --dport 18:80 -j DROP  <----最佳方法
iptables -A INPUT -p tcp --dport 22 -j ACCEPT
iptables -A INPUT -p tcp -s 10.0.0.0/24 -j ACCEPT
iptables -A INPUT -i lo -j ACCEPT
iptables -A OUTPUT-o lo -j ACCEPT
iptables -A INPUT -s 182.18.73.214/27 -p all -j ACCEPT       #办公室固定IP段
iptables -A INPUT -s 10.0.0.0/24 -p all -j ACCEPT            #IDC机房的内网网段
iptables -A INPUT -s 10.0.0.0/24 -p all -j ACCEPT            #其他机房的内网网段
iptables -A INPUT -s 115.182.62.0/24 -p all -j ACCEPT        #IDC机房的外网网段
iptables -A INPUT -s 203.82.23.0/24 -p all -j ACCEPT         #其他IDC机房的外网网段
yum install nmap -y
[root@linux-node1 ~]# nmap 192.168.56.5 -p 1-65535

Starting Nmap 5.51 ( http://nmap.org ) at 2017-07-18 03:41 CST
Nmap scan report for linux-node1 (192.168.56.5)
Host is up (0.0000050s latency).
Not shown: 65534 closed ports
PORT   STATE SERVICE
22/tcp open  ssh

Nmap done: 1 IP address (1 host up) scanned in 1.02 seconds
七、企业案例
7.1 写一个DDoS工具生产脚本
提示:根据web日志或者或者网络连接数,监控当某个IP并发连接数或者短时内PV达到100,即调用防火墙命令封掉对应的IP,监控频率每隔3分钟。
防火墙命令为:iptables -A INPUT -s 10.0.0.0 -j DROP
#!/bin/sh
#
[ -f /etc/init.d/functions ] && . /etc/init.d/functions

IP_file="/server/scripts/ddos.txt"
IP_filter_command="iptables -I INPUT -j DROP -s"
IP_recover_command="iptables -D INPUT -j DROP -s"
function IP_check(){
 grep "EST"  ${IP_file}|awk -F "[ |:]+" '{print $6}'|sort |uniq -c|sort -rn -k1 > /server/scripts/ip.txt
}
function IP_filter(){
  exec < /server/scripts/ip.txt
  while read line
  do
    IP_count=`echo $line|awk '{print $1}'`
    IP=`echo $line|awk '{print $2}'`
    IP_fil=`iptables -L -n|grep "\b${IP}\b"|wc -l`
    if [ ${IP_count} -gt 25 -a ${IP_fil} -eq 0 ];then
       ${IP_filter_command} ${IP}
       echo "${IP}" >> /server/scripts/ip_filtered.txt
       action "Filter ${IP}" /bin/true
    fi
  done
}
function IP_recover(){
  exec < /server/scripts/ip.txt
  while read line
  do
    IP_count=`echo $line|awk '{print $1}'`
    IP=`echo $line|awk '{print $2}'`
    IP_fil=`iptables -L -n|grep "\b${IP}\b"|wc -l`
    if [ ${IP_count} -le 25 -a ${IP_fil} -eq 1 ];then
       ${IP_recover_command} ${IP}
       echo "${IP}" >> /server/scripts/ip_filtered.txt
       action "Recover ${IP}" /bin/true
    fi
  done
}
function main(){
   case "$1" in
     filter)
     IP_check
     echo "$(date +%F-%H:%M:%S) filtered by $(whoami)" >> /server/scripts/ip_filtered.txt
     IP_filter
     ;;
     recover)
     IP_check
     echo "$(date +%F-%H:%M:%S) recovered by $(whoami)" >> /server/scripts/ip_filtered.txt
     IP_recover
     ;;
     *)
     echo "USAGE:$0 {filter|recover}"
     exit 1
   esac
}
main $*
7.2 实现访问10.0.0.5:80请求转发到10.0.0.6:80上
iptables -t nat -A PREROUTING -d 10.0.0.5 -p tcp --dport 80 -j DNAT --to-destination 10.0.0.6:80
iptables -P FORWARD DROP
7.3 iptables生产案例
需求:
iptables -t nat -F
#vim /etc/sysctl.conf
net.ipv4.ip_forward = 1
3、生效
sysctl -p
4、增加模块
modprobe ip_tables
modprobe iptable_filter
modprobe iptable_nat
modprobe ip_conntrack
modprobe ip_conntrack_ftp
modprobe ip_nat_ftp
modprobe ipt_state
B服务器:
1、route -n 查看路由
[root@linux-node2 ~]# route -n
Kernel IP routing table
Destination     Gateway         Genmask         Flags Metric Ref    Use Iface
172.168.1.0     0.0.0.0         255.255.255.0   U     0      0        0 eth1
192.168.56.0    0.0.0.0         255.255.255.0   U     0      0        0 eth0
169.254.0.0     0.0.0.0         255.255.0.0     U     1002   0        0 eth0
169.254.0.0     0.0.0.0         255.255.0.0     U     1003   0        0 eth1
0.0.0.0         192.168.56.2    0.0.0.0         UG    0      0        0 eth0
2.增加路由
[root@linux-node2 ~]# route -n add default gw 172.168.1.5
[root@linux-node2 ~]# route -n
Kernel IP routing table
Destination     Gateway         Genmask         Flags Metric Ref    Use Iface
172.168.1.0     0.0.0.0         255.255.255.0   U     0      0        0 eth1
192.168.56.0    0.0.0.0         255.255.255.0   U     0      0        0 eth0
169.254.0.0     0.0.0.0         255.255.0.0     U     1002   0        0 eth0
169.254.0.0     0.0.0.0         255.255.0.0     U     1003   0        0 eth1
0.0.0.0         172.168.1.5     0.0.0.0         UG    0      0        0 eth1
0.0.0.0         192.168.56.2    0.0.0.0         UG    0      0        0 eth0
3、关闭外网
ifdown eth0
A服务器
执行
iptables -t nat -A POSTROUTING -o eth0 -s 172.168.1.0/24 -j SNAT --to-source 192.168.56.5
B服务器检查上网情况
[root@linux-node2 ~]# ping www.baidu.com
PING www.a.shifen.com (119.75.216.20) 56(84) bytes of data.
64 bytes from bogon (119.75.216.20): icmp_seq=1 ttl=127 time=5.32 ms
64 bytes from bogon (119.75.216.20): icmp_seq=2 ttl=127 time=16.3 ms
^C
--- www.a.shifen.com ping statistics ---
2 packets transmitted, 2 received, 0% packet loss, time 1763ms
rtt min/avg/max/mdev = 5.327/10.827/16.328/5.501 ms
注意: 当你ping网关能ping通,那么恭喜你已经配置成功了,为什么上不了网呢?
原来我们都被默认的防火墙规则坑了,我们现在需要做的是将防火墙默认规则删除,然后保存,重启防火墙。
这里强烈推荐一篇文章:https://fashengba.com/post/centos-iptables-pit.html 能为您解答上面的问题。
神回复
发表评论:
◎欢迎参与讨论,请在这里发表您的看法、交流您的观点。